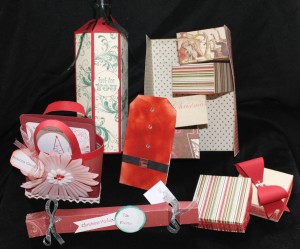
With Christmas just around the corner, and with my very recent jump into running my own Kaszazz Classes, I’ve been busy for the past few days re-creating some awesome projects to solve nearly every Christmas wrapping dilemma I can imagine! Mind you, this list is still growing…so bear with me please.
I can’t take credit for creating any of these projects, I’ve found a plethora of inspiration on both Pinterest and YouTube. I’ll post some of the links below along with pictures of the projects. I’m a firm believer in giving credit where it is due, and with these lovely ladies having shared in the first place, only fair to recognise them.
Last Christmas was the first time I focused so much on personally creating gifts, and the wrapping, for our close friends and family. Given my limited Skill Set, wasn’t a bad effort, though I do cringe slightly today when I look back at the photos. I know my friends especially appreciated their gifts, partly because it came from me and The Man, and partly because they understood how much it took for me to make them in the first place given my medical circumstances. This year, I’m sure they’ll enjoy everything just as much.
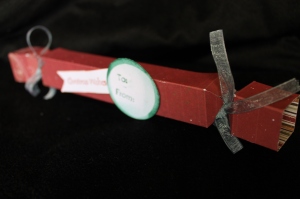
First project I’ve tackled is Christmas Crackers/Bon Bons. Loved making these last year. And loved making this little one using scraps from a larger project (keep reading, it’s coming up soon…I promise), so it’s smaller than the ones I’ll be making next week. On the To Do list is to make up boxes of 6 Bon Bons to give to friends for their Christmas Table.
This little beauties are super easy to make (as are most of the projects I’m currently tackling) though they appear to be more complex than they really are. The hardest part was tying ribbon with my nails at their current length! And using the Envelope Punch Board makes this a cinch to decorate.
Here’s the original YouTube link that I keep going back to; Envelope Punch Board Christmas Bon Bons. There’s plenty of tutorials on YouTube, and I love to scroll through to see what is available. Some of the creativity is amazing!
And here’s my mini version using scraps from the Kaszazz Merry Christmas SB Paper “Journal Stripes”.
I’ve also used the Mini Messages Christmas Un-cut Stamp Set (4109KK) for the sentiments using Distress Ink Pads in Fired Brick (TIM20202) and Pine Needles (TIM21476) along with 1/8″ Organdy Ribbon (5527) coloured with the Pine Needles Distress Ink Pad and an Ink Blending Tool. All products are available from Kaszazz; contact me for more information.
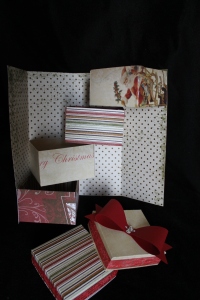
I’ve also made up a Tower Box again using Kaszazz Merry Christmas SB Paper, this time in “Greetings Dots” for the main body, “Journal Stripes” and “Santa’s Sleigh” from the Kaszazz Vintage Christmas SB Paper Collection for the internal boxes.
The tutorial for this is also from Youtube; here is the link if you’d like to make this one yourself. Christmas Gift Tower Box/House
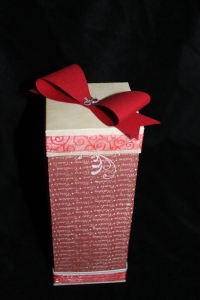
The top and bottom has been decorated using a Bow in SB Essentials 12×12 Rouge Cardstock; Bow was made using the Bow Thick Paper Die, and 1/2″ Organdy Swirl Ribbon coloured with Crimson Alcohol Ink Art Marker.
I’d made one of these the previous evening for The Man to store his wedding ring in while he’s at work, along with his cufflinks and shirt studs…so all his formal bling is now nicely stored in one place without it being a jewellery box.
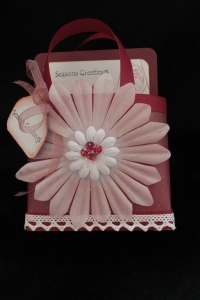
Yesterday was a big crafting day for me after being inspired by another Kaszazz Consultant making Mini Tote Bags with Note Cards. Like myself she was inspired by a YouTube find, and was kind enough to share the link with the rest of us. And I’m now going to share with you! Mini Tote Cards & Bag
I actually made a few of these yesterday, and enjoyed every moment! But this one is made using the Kaszazz Merry Christmas SB “Journal Stripes”, SB Essentials Rouge 12×12 Cardstock for the main body and handles.
I then added some 3/8″ Lace Style 5 Ribbon along the base, a little tag using SB Card Essentials White and attached using 1/8″ Organdy Ribbon coloured with Distress Ink Pad Fired Brick. Tag is also edged using Fired Brick. The two daisies are also Kaszazz, though sadly will not be in the new catalogue coming out next month. The large one was coloured using Fired Brick and an Ink Blending Tool. I coloured four 6mm Clear Rhinestones with Crimson Alcohol Ink Art Marker before attaching with Ice Stickles. Sentiment is from the Mini Messages Christmas Un-cut set.
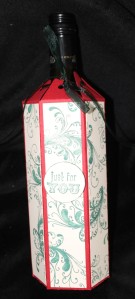
Finally last night I completed my To Do list with a Wine Bottle Bag/Cover. As a few of my friends enjoy a drop of wine, I thought this would be a great addition to any future Class I run where Gift Giving is the focus. Sadly I was unable to find a Kaszazz Workshop that would work, so to Pinterest I went. That was a little frustrating, though I’ve found plenty of inspiration to refashion jeans into wine carriers…that’s for another post another week. But finally, success and off to YouTube to observe and learn.
This tutorial was super easy to follow and work from. And a heap of fun at the same time! I’m a fan…can you tell? hehehe Here’s the link before you want to shoot me; Wine Bottle Gift Box Tutorial
I followed the instructions to the letter, with one exception, but I’ll get to that in a sec. I used, as recommended, Kaszazz SB Essentials 12×12 Rouge Cardstock for the base, SB Pages Ivory 12×12 Cardstock for the panels and stamped with the Fancy Flourish (4222K) Stamp in Distress Ink Pad Pine Needles. The only alteration I made was making the panels an inch shorter to fit my score lines on the main body. Otherwise, brilliant tutorial! Closed off with the 1/8″ Organdy Ribbon coloured with Distress Ink Pad Pine Needles. I then picked out the “Just For You” Stamp from the Mini Messages Retro Un-cut Set (4467K) to stamp on some scrap Ivory Cardstock with the Pine Needles Distress Ink Pad before punching out with the Large Circle Punch (4857) before attaching with Magic Mount Double Sided Tape.
I’m still in shock we had a bottle of wine in the house…it is opened, but as a prop it works great! Which reminds me, need to stock up to get the Christmas Pudding fruit drunk sooner than later. So that will mean more bottles in the house. And the chance to grab a few to make more Gift Boxes. Sounds like a plan. I have found this box is a little roomy for the Shiraz bottle I had on hand, but that’s not a bad thing.
That’s it so far…more to come in the coming weeks. Now I’m off to get these nails shortened and redecorated, hair trim and eyebrow wax…yep, GIRLY TIME!!! Then to finish preperations for my First Card Class on Sunday!
If you do re-create any of these projects please share a picture with me, as I’d love to see how you interpret the instructions, or how you adapt them to suit your own needs. Also, if you’d like to know more about Kaszazz products, please contact me as I can help with that too!

