Search

DIY TALEZ

My adventures into the world of DIY…the good and the not so good.

Tag

easy

Rosewater Flavoured Choc Filled Meringue Kisses

Straight out of the oven.

I’m rather pleased with myself this morning for managing to re-create these little beauties. Thank You to Darla from Bakingdom for such an easy recipe to follow and produce. You’ll find it here if you’d like to try for yourself.

I did make a few little alterations to my version. I used Rosewater instead of Raspberry Flavouring, which has filled the house with a gorgeous scent all morning. And I wasn’t able to find any small choc buds in our local supermarket yesterday so have used buttons instead, making some of these larger than originally planned.

Choc Button base

Now I’ve never been great with meringue to be honest, but found this method to be a cinch. Took a little longer but the results speak for themselves. And even with a few little mobility hiccups, this is an easily, and quickly, made recipe. I even had a laugh to myself when I was cleaning up the piping bag…talk about a Pink Sticky Sweet Mess.

And yes, I need to work on my piping technique come to think of it. Oh well, I’ll get there one of these days…in the meantime, if it’s messy I’m there.

Enjoy!

Plate of Kisses


Boxes, boxes and to be different..tag!

I’m certainly enjoying my new talents, truth be told I’m enjoying my new tools hence my new talents.

Over the past two days I’ve made the template/sample of our completed wedding invite, with RSVP envelope, an envelope gift tag, a few cards and two different styles of boxes.

The Man and I have decided I’m going to alter the tag a fraction and we’ll be using these as our Escort Cards/Place Cards at our reception. Something quirky, different but still functional. I’m actually really impressed with how quick and easy they were to make up, especially as I’m what I would still consider a beginner in the art of papercraft.

Here’s the link to the YouTube tutorial that inspired me to begin with.

https://www.youtube.com/watch?v=OpmPzeC8XMg&feature=youtu.be&a


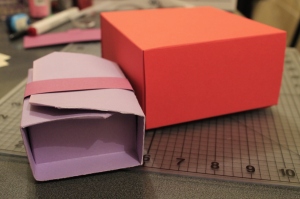
This morning I also decided to learn how to make at least one different style of box, especially with Christmas just around the corner. Am thinking ahead as to which gifts can go in different boxes. Again, really quick, easy and functional. You can find the link here: https://www.youtube.com/watch?v=NqzWGlQuYBk&feature=youtu.be&a

_MG_3260

And yesterday I posted on my Facebook page a link to make a gorgeous little box that requires no cutting at all! One of my friends made one earlier today, and sent me a picture, as well as holding me accountable to my promise to make one before the morning. I do love accountability. So, after a failed attempt with my gorgeous Kaszazz Damask paper, I reverted to using up some of my old cardstock from K-Mart and started over again. It looks amazing when finished, is certainly different and a little bit of a challenge on some of the folds, but if this beginner can do it, anyone can do it!! The link you need to make these yourself is: https://www.youtube.com/watch?v=4aTBCynHqEU&feature=youtu.be&a

Am certainly enjoying myself, and creating so many different items out of paper. Am still trying to work out a way to turn this into some pocket money for myself, but no rush.

If you attempt any of these projects yourself, please send me a picture of your completed work, then I can celebrate with you. Also, if you have any tips, hints or recommendations, please let me know as well.

Such a cute little project, I had to share it!

Even though I’ve started working out all my DIY Christmas gifts, I’m still hunting around for new ideas…with a few birthdays not long into the New Year it’s great to have something already in the pipeline!

Stumbled up this tutorial on making a cute, little coin purse.

http://allforthispenny.blogspot.com.au/2010/02/coin-purse-tutorial.html

Would love to know what you think, and if you try it out, please let me know how it goes!!


How I made a modified Ribbon Elephant

To celebrate my Godson’s birthday today I made up a project I’d been thinking of for some time. A soft toy elephant in his favourite colour.

I found the pattern a little while ago on the Sew Daily site, in their free e-book section. They have some of the cutest projects that are so easy to make and so much fun. Worth a visit when you’ve got a few minutes. http://www.sewdaily.com/free-sewing-patterns-for-kids/

Today I used some yellow jersey knit and animal print cotton to create his birthday present. (Materials from Spotlight and Big W) I didn’t need much to be honest, so this is a perfect project to use up some of those odd scraps that are left over.

After ironing out the creases in the cotton I cut out my pieces to start this new journey.  Please forgive the choice of pins, somehow my pearl top pins have grown legs and wandered off.

Starting point

The included instructions are very easy to follow, and all up this project took less than an hour to complete.

I modified the original pattern in two ways…I omitted the ribbons around the ears (though this would be great for younger children & babies) and used different material that I had on hand. Next time I’ll make it according to instructions, just for something different.

Hope you’ve enjoyed this little tutorial, and if you also make up this pattern, or any of the other three included in the free e-book, please share your pictures, as I’d love to see what you create.

Starting to come together_MG_2719 _MG_2722


Up ↑