Search

DIY TALEZ

My adventures into the world of DIY…the good and the not so good.

Tag

wedding invites

Wedding done & dusted….and enjoyed!!

The weekend has seen a rather impressive celebration going on within The Clan…The Man made an honest woman out of me!!

All the DIY we’d experimented with certainly added that little extra something as I’d hoped it would…and now that’s done I can refocus on some other projects I’ve been eager to sink my teeth into!

From our Save The Dates through to our Wedding Programs, I’m actually quite chuffed with our efforts.

Hope you enjoy the photos, and if you’re curious about any of them, just ask and I’ll endeavour to fill you in on the details.

Wedding Invitations finished & delivered….on time

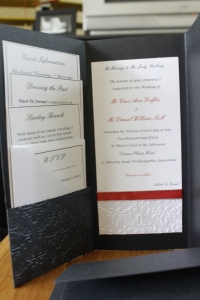
The largest DIY undertaking for our upcoming wedding has always been the invitations themselves. After many ‘mock up’ invites we finally decided on a style that we both liked, and that I was comfortable to be able to make. I’m a huge believer that the invite is the ‘first glimpse’ the guests have of your wedding style, as well as an indication of the formality of the festivities. To make that happen I did feel a bit of pressure to deliver.

I’m proud to say I believe I nailed my brief.

All supplies were from Kaszazz, with two exceptions. Our printing was done professionally (great savings as in total it was less than it would’ve cost us in ink) and our wax seal from Seals 4 You. We had our own monogram made up, and ordered the flexible wax to create the above seal on the back of our invites.

These were a heap of fun to make, and the results have been well recieved by all our guests. I’m still in shock that we managed to keep them secret until everyone recieved theirs in the post. Most unusual for me, as I’m so excited to share my creations, I normally can’t hold back!

All the ribbon was hand coloured using Alcohol Ink Art Markers in Rouge, to cover the White Shimmer Embossed Paper at the base of the invite itself. Black Shimmer Cardstock was used to create the folder as well as the embossed flap to hold the inserts and RSVP details neatly inside. I used the Damask Embossing Folder to create the embossed effect, as this most closely matches other details of our decorations. I also used the White Shimmer Paper to create our RSVP return envelopes, along with my Envelope Punch Board. Having all the tools onhand has made this a real treat, enjoyable and an experience I’m proud of.


A day of firsts for me.

HAPPY FRIDAY!!

This has been a fantastic week to kick off the New Year. The Man & I have accomplished so much already this year, and it promises to just keep getting better and better.

Today my latest Kaszazz delivery arrived, with a heap of new goodies for me to play with. New goodies = new experiences.

To kick off my day of firsts, mowing the yard with our new lawnmower. I actually quite enjoy the time mowing, it might be as I’m able to see what I’ve accomplished as I’m doing it, plus the lovely smell of freshly cut grass. Certainly started my day on a high note.

I’ve finished off this morning painting the bottom half of my latest wedding project, but as it’s still not 100% finished, you’ll just have to wait a little bit longer. I’m itching to share it with everyone, but patience is a virtue so everyone keeps telling me. I also managed to finish off the base card for our wedding invitations this morning, so next week will see The Man and I off to visit our printer to start planning out the wording for everything.

And then my goodies arrived!!

I’m now the proud owner/user of a gorgeous silver embossing powder, static away pillow to make sure my embossing is neater than it would otherwise be, some ultra cute new stamps and some beautiful papers to make up birthday and new baby cards with.

I’ve never embossed before using powders and heat. As I am yet to invest in a heat gun I used the toaster to set my powder on my first little embossing attempt. Other than needing to balance out the distribution of my ink on my stamp, I’m quite pleased with my first attempt. Room for improvement, but I know where, it’s now going to come down to practice!

And a little while ago I used my new Alcohol Ink Art Markers to colour in one of my stamp pictures. Again, a first for me. There is a little bit of bleeding around the edges, which I’m assuming will come down to practice again. Was a heap of fun to do though, and I’m now bursting with ideas for a few of the nephew’s birthday cards. And the new baby cards I’ll need within the next few weeks.

It’s been a fantastic day to wrap up an awesome week for me. Am hoping that I’ll be able to share my latest project with you all, maybe before another week is gone, but no promises. It’s now up to The Man to do a bit on it before I can go any further. And after celebrating his birthday and working hard all week, I’m not going to push him too far….yet.

Wishing you an amazing weekend ahead!

Papercuts, cards & fun

I’ve been a bit on the quiet side for the past few days, mainly due to a slight storm that had us without power for a day, and a lot of fallen trees that needed to be cleared up. But, this week is a new week, and much is certainly happening.

Last week my mother gave me my Christmas/Birthday present rather early…I’ve now become an Independent Consultant with Kaszazz, and Australian Company focused on papercrafts; stamping, scrapping & embellishing. The main reason for me joining? Consultant discount so we’re saving even more $$$ making our wedding invitations and stationary. Simple really, but the possibilities are endless if I choose to take them.

My ‘kit’ arrived yesterday, and so did my first serious papercut while I was unpacking it all. OUCH!!! Wasn’t too bad till I decided to slice up some fresh pineapple to cook up with dinner. Trust me, raw pineapple juice in a papercut IS NOT FUN!!
Today, my first order arrived…including my new Envelope Punch Board. The options with that one tool are endless! Really looking forward to creating some interesting projects with that!

First order of business though are our invites. I made a ‘template’ up last night, and today I will make up the official template/mock up so next week when my friends are over to help get cracking, we’ve got a design to follow!

And having just shown The Man the cardstock we selected, and having his seal of approval, am glad we’re doing this ourselves. It’s certainly been a bonding experience.

And just before I threw together a card which will be used in the New Year for one of our many family occassions. I’m actually quite pleased with the end result. It’s not Kaszazz paper/card that I’ve used, but I did enjoy using my EzyPress with the Bow Die. And some of the stamps we picked up from K-Mart a few weeks ago.

Very exciting times ahead, that’s for sure. I’m actually starting to get excited about it all, even though our wedding is coming up sooner than I’m totally comfortable with. The countdown is skipping through the weeks faster than I thought possible. But we’re organised, so everything is going to be fantastic, and no stress involved. And now…now I’m off to open up my goodies and start creating.

Paper Embossing 101…how hard can it be?

I’m a massive believer of sticking to my ‘skill set’ when it comes to doing big projects. In my attempt to gain all the experience I can prior to embarking on our own wedding invitations, I’ve extended my skill set to include using my new die cutter machine The Man has so generously purchased for me.

How hard can it be to ‘stack’ paper, include the embossing folder, and roll it through?

Actually, pretty simple once I made a call to my mother to confirm which way is up on the cutting mats…thank goodness she’s only a phone call/text message away.

And embossing?

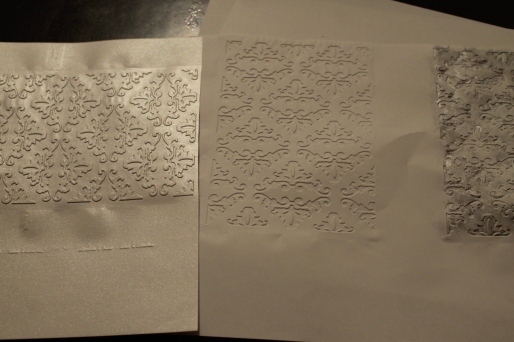
Pretty much a cinch. Once I figured out what I can put through in regards to paper weight v card stock. I am now well versed in the type of paper I can pop through our machine at least. In regards to other makes and models, hmmm, I’ll get back to you on that.

But now the world of embossing my own paper has opened up to me…and the options are limitless!

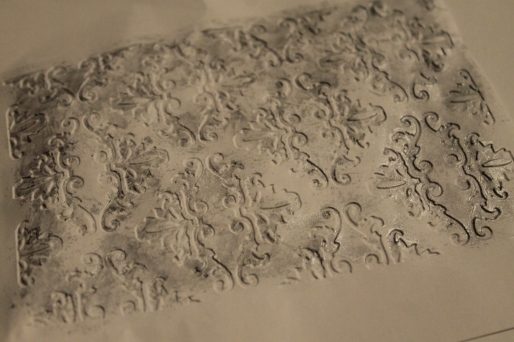
I’ve just been playing around this evening…ahem, practicing, not playing…and am actually pretty chuffed with myself. Ok, I’ll really need to read up on how to embossing with a different medium included, as the picture shows I flunked that one. Lesson noted, to be attempted again after research.

All in all, I’m now more confident our wedding invitations will look as I’ve imagined, and be appropriate for our style. Time will tell.


Up ↑