Search

DIY TALEZ

My adventures into the world of DIY…the good and the not so good.

Tag

wedding decorations

Wedding done & dusted….and enjoyed!!

The weekend has seen a rather impressive celebration going on within The Clan…The Man made an honest woman out of me!!

All the DIY we’d experimented with certainly added that little extra something as I’d hoped it would…and now that’s done I can refocus on some other projects I’ve been eager to sink my teeth into!

From our Save The Dates through to our Wedding Programs, I’m actually quite chuffed with our efforts.

Hope you enjoy the photos, and if you’re curious about any of them, just ask and I’ll endeavour to fill you in on the details.

Messy DIY days ahead.

I’m a huge fan of having fun and being messy when doing things, so the next few days are going to be heavenly for me. This week I’m focusing on the cake knife & server decorations as well as our seating chart.

I’ve been scouring Pinterest yet again for ideas and inspiration. The Man has also been scouring online for pictures of knife decorations in line with our style/taste. Bless his little cotton socks. The search had frustrated me, which is why The Man pitched in. But now we’re on the right track, and I can start putting everything into place. And thought I’d share some of the images that inspired us.

The seating chart was a world easier, and too many options that I love. To do this project up I’ve had to call an end to the truce I had with my Hot Glue Gun, and I’m already suffering for it. The price we pay…hehehe.

All this means this week will be messy!! Ink spraying for the cake knife & server, and a lot of cutting, gluing and blinging for the chart. Just as well I tidied up yesterday, fresh start for my latest mess.

1f1dd199109b9eb8178d32e801541c7e 1fc9b4357e43a6572cd3417490ad9c43 3c871734522edac023463adceb91fee7 3487053ea499225aa6565326b56e02e3 1d03a79be40703d16123ed428f597893 DIY-Seating-Chart-5 827be07ddcbca384289bf6a95d67b7c9 43cdbcef4804f44e4f72d2ff7b304f31 Matt Edge 3dcacc28514b051fae660145e0e1f213


Smaller Wedding details rule the day.

The past few weeks have been swallowed up, rather quickly, with wedding details. Our dining table is more of a craft table/wedding HQ than a table for us to eat on. Only a few more months, then hopefully some semblance of normal will return. Maybe.

I’ve taken a breather for the past few weeks, after getting all the invites out in the big, wide world I needed a little down time. Now it’s over, and I’m starting to plan out, and mock up, our Placecards, along with designing our Table Chart, Thank You cards and to continuing debate of to Program or not to Program.

I’ve been scouring Pinterest yet again for ideas, inspiration and any tutorials I can get my hands on. You’d think Placecards would be pretty straight forward and easy, well I did until the past week. I couldn’t have been more incorrect if I’d tried. It has been fun though, as I’ve played with glitter (yes, the house is wearing it well) stuck myself with glue more times than I can count, burnt my fingers while playing with the heat gun…..note the hot glue gun is still in hibernation, our peace treaty is still in effect.

The end result?

The Man & I have worked out what we like, how we want them to look and the budget. All boxes ticked!

Might need to stock up on some burn cream/powder while I think of it…heat gun and I are going to get very up close and personal.

mock up selection placecard mock up  #2 placecard mock up #1


Wedding Invitations finished & delivered….on time

The largest DIY undertaking for our upcoming wedding has always been the invitations themselves. After many ‘mock up’ invites we finally decided on a style that we both liked, and that I was comfortable to be able to make. I’m a huge believer that the invite is the ‘first glimpse’ the guests have of your wedding style, as well as an indication of the formality of the festivities. To make that happen I did feel a bit of pressure to deliver.

I’m proud to say I believe I nailed my brief.

All supplies were from Kaszazz, with two exceptions. Our printing was done professionally (great savings as in total it was less than it would’ve cost us in ink) and our wax seal from Seals 4 You. We had our own monogram made up, and ordered the flexible wax to create the above seal on the back of our invites.

These were a heap of fun to make, and the results have been well recieved by all our guests. I’m still in shock that we managed to keep them secret until everyone recieved theirs in the post. Most unusual for me, as I’m so excited to share my creations, I normally can’t hold back!

All the ribbon was hand coloured using Alcohol Ink Art Markers in Rouge, to cover the White Shimmer Embossed Paper at the base of the invite itself. Black Shimmer Cardstock was used to create the folder as well as the embossed flap to hold the inserts and RSVP details neatly inside. I used the Damask Embossing Folder to create the embossed effect, as this most closely matches other details of our decorations. I also used the White Shimmer Paper to create our RSVP return envelopes, along with my Envelope Punch Board. Having all the tools onhand has made this a real treat, enjoyable and an experience I’m proud of.


The Great Baby’s Breath Experiment

IMG_3779

I’ve come up with the great idea of having Baby’s Breath as part of our Ceremony decorations…but not just white, I want coloured Baby’s Breath. The Man was a bit concerned to begin with as he was under the (mistaken) impression Baby’s Breath came in blue, white or yellow shades. Once he realised he was thinking of different flowers, he started to get excited about this little experiment that has taken over our kitchen.

Phase One started on Saturday. Phase Two was Sunday while Phases Three & Four will be attempted in the coming days.

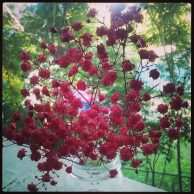
Saturday saw me purchasing two bunches of Baby’s Breath at our local marketplace. Once returning home I filled up two vases, one with red food dye, one without. I can’t remember how much dye I actually squirted into the first vase, suffice to say, it was amble. And then I sat back and waited…and watched.

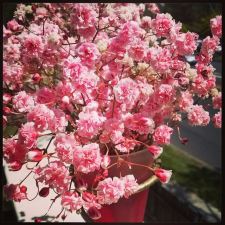
Three hours into the experiment we noticed a slight tinge of pink coming through some of the blooms. It was working!! Before going to bed that night there were more signs of colour seeping into the petals which made me very excited to see what Sunday would bring. More colour and me trimming the longer stalks on each mini bunch to allow the dye to travel less distance to each bloom. I also topped up the water and food dye to ensure there was enough available. The colour changes kept coming and it was pretty awesome to see the colour spreading through the veins of each petal.

10403350_10152991521056001_846828178544950890_n

Sunday also saw me undertake Phase Two. This included a pair of rubber kitchen gloves, an empty box and a can of red spray paint…just your run of the mill hardware store variety. I snipped off two sections from the second bunch of Baby’s Breath and sprayed to my hearts content inside my little cardboard ‘booth’.

My findings? Quick, messy, vibrant. If we’re cutting it close time wise certainly the way to go. But I wasn’t sold on the effect, and explained this to The Man when he finished work Sunday morning. I’m still not sure tonight if it’s the coloured stalks that isn’t grabbing me, or the fact the blooms look like coloured popcorn. But overall, in comparison to the dye flowers, I just wasn’t feeling it.

We agreed to give the dye lot four days to take before removing them from their colour source. If this is the way we’re going to make my vision a reality then we’re prepared to do so four days prior to our wedding. I’ve been documenting the progress with photos so we can refer back to them when all the options have been trialled…but I must admit, so far I’m sold on this method.

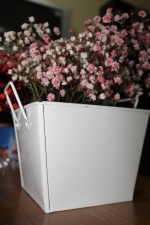
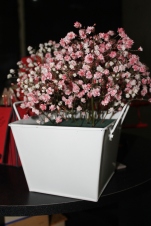
And today was Day Four, so out they came from their food dye water and into a florist sponge and the little metal bucket we’re going to be using on The Day. I didn’t arrange them in the foam, was more concerned to be honest with the food dye staining my manicure (forgot the gloves!!!) but I am impressed with the look. One valuable lesson, we’ll need two bunches per bucket to give it that ‘full’ look. Our florist is going to love me before too much longer!

On Saturday I’d said they were looking like mini carnations when the colour started coming through, and it’s stuck in a sense. Not every bloom coloured, some only partially, others virtually not at all. But the effect is WOW in my opinion. The Man is quite struck with it too. Very pretty, unstated and cute.

IMG_3775 IMG_3779 10959620_10152993973206001_7732129828168088976_n

Now to prepare for Phase Three!!

DIY Wedding project/science experiment Take 1

There would be an easier way to see if what I’m attempting can be done, though I wouldn’t have anywhere near as much fun doing it an easier way. So…this week I’m attempting to work out the best way to colour Baby’s Breath red for our aisle flowers.

First up, purchase two bunches of abovementioned flower from the Brisbane Markets….helps that it’s only a few minutes walk from my front door.

Secondly, clean vases! This was all decided on the spur of the moment to put some thoughts into deeds…hence I wasn’t entirely prepared to begin with. Eeeeek!!!!

Next, add a good amount of red food dye to one of the vases’ water supply. I’m after a vibrant red colour as the end result, so I was rather generous with the colour. Don’t forget to wash off any residue on your hands/fingers!

Follow up by ‘scoring’ the stem end of bunches…I used my trusty kitchen scissors and snipped up a small amount of the stem. Once ‘scored’ place bunch in coloured water….and wait.

Tomorrow I’ll attempt to spray paint the second bunch to see how I like the effect. My vision is to have alternate bunches of white and red Baby’s Breath lining our aisle, but that will of course depend on this little experiment. And if it turns out I’ll be painting flowers I’ll start feeling like a character in Alice in Wonderland painting the white roses red. It will be messy….so  I should have a blast!


Stay tuned for further photos and progress notes! 🙂

Up ↑