Search

DIY TALEZ

My adventures into the world of DIY…the good and the not so good.

Author

CraftyCan

Like most of us, I'm multi-faceted. My family, including extended, and my close friends mean so much to me, and I'm very selfish when it comes to my time with them. I'll even switch my phone to airplane (unless I'm aware of a situation requiring contact) so our time together is 'together'. I love the thought of creating something unique to give to our friends and family...something that I've thought about, something to put a smile on the face of the person receiving...this makes me happy. I really don't ask for much, only the world, but in the meantime while I'm waiting for that to happen, I'll continue on my merry way of crafting and DIY'ing the space around me.

Christmas Cookies Diva Style….or not.

MERRY CHRISTMAS!!!

Well, I’m a week early, but considering how hectic everyone gets at this time of year, better to be early.

I thought last night I’d be a totally normal little DIY Diva and start baking some Sugar Cookies to give to friends for Christmas…I mean every ‘normal’ person starts mixing cookie dough at 6 in the evening don’t they? By the time I’d baked the first batch, waited for them to cool and clean up my explosion of mess in the kitchen it was after 9pm, so decided to put the decorating off till the morning. And again, being totally ‘normal’ I was up a little after 4am mixing up the icing batches to decorate my little goodies. I finished icing the first batch by 5.30 and have managed to clean most of that mess up!

Cookie Dough in quarters

Now before anyone starts questioning my sanity of baking so late in the day, or decorating so early in the morning, please note, it is Summer here in Brisvegas. Which means during the day the last thing I want to be doing is opening an oven door with a further 200 degress blasting at me…and for the icing to not be as runny as it would be during the middle of the day, early morning is the best time to be doing it! Plus I’ve been up since 2ish, so for me it was nearly morning tea time. Gotta love being married to a night shift worker.

Straight out of the oven.. christmascookiesbymeMore Icing

The recipe I used for these little darlings can be found here. I found it on Pinterest, along with many others, but thought I’d use this one last night…it seemed simple enough, and it actually was! It’s no-one else’s fault that my decorating skills are rather poor…closer to pathetic truth be told. But the instructions are Cari Proof to follow, so don’t let my end result put you off.

I mixed it up with a little peppermint flavouring added to the dough, along with vanilla…and added rosewater flavour to the red icing, peppermint to the green icing. My little hint/cheat would be to use baking paper to do the icing on. Easy as to clear away when you’ve finished. And having tested one…oh ok, two, I’ve tested two cookies…hmmmm, YUM!!! Glad none of our friends are giving these to us, coz the hips would be spreading for sure!

Ready to gift.. :)

Now to bag these goodies up, add a personal tag and they’ll be ready to share with everyone!! Otherwise I might not have the self control to prevent myself from testing some more!!

Building up on Techniques

I don’t know about you, but it’s certainly feeling a lot like Summer here. And I’m finding the same issues in this heat that I found last year when I first started with Kaszazz. Actually today is my 1st Anniversary as an Independent Consultant. Woohoo!

Cards I made up last year just after joining Kaszazz as an Independent Consultant.

But along with those issues (double sided tape is sticking to me as much as my projects) I’m also finding out how fun some techniques are to do. I’ve been a little stagnant over the last few months, but have decided while I’m getting stuck up anyway (that awesome double sided tape again!) I’ll actually stretch my wings a little and attempt a few new techniques. It helps having my Card Class this weekend, as there are 3 new techniques in there I had to grasp to be able to teach.

One technique I’ve been keen to try while at the same time been too intimidated to attempt is using Distress Paints/Dylussions Spray Ink on plain washi tape to create my own designs. Last night I bit the bullet in a manner of speaking. After doing up the Sample Cards for the weekend, I was feeling like Queen of the World…and before I knew it, I was making more mess and smiling like a dolt.

Kaszazz Workshop "Summer Background Cards" (2H1629) created by Jasmine Eccles
Kaszazz Workshop “Summer Background Cards” (2H1629) created by Jasmine Eccles

Obviously I’ve been overthinking it all this time while silently desiring the skill.

I decided, ok pain levels decided, last night I’d done enough so I’d allow the Distress Paints to dry overnight instead of using the Heat Tool to do the work for me. This morning I came out and right off the bat stamped my Merry Christmas message on the washi tape. I used Stayz On Ink Pad for the stamping, just so it would pop that little bit more. Then, following a Kaszazz Workshop that was the inspiration behind this endeavour in the first place, I transferred the washi tape to some cardstock. After arranging it all I inked up my Merry Christmas Stamp again, this time with Distress Ink Pad Picked Raspberry and plopped that gem right in the middle of my taped areas. This will be going into my Technique Journal before I do anything for an actual card or page. But I love it. I’m calling it my Troppo Christmas as it’s got that very Aussie Summery Christmas feel to it. Similar to watching a sunset over the Pacific Ocean.

Washi Tape & Distress Paint = Troppo Christmas

I’ve also been working on some Birthday Cards this week which need to be popped in the post tomorrow. Four cards going out in the next mail drop for family across this great country. One of my faves is done with acetate sheets (also available via Kaszazz). The trickiest part is lining everything up on both sides of the sheet so it appears seamless. I love how the end result looks…something a little different to the normal cardstock. The techniques certainly require more attention to detail, and I do need to practice a fair bit to be able to stamp with Stayz On directly onto the acetate sheet. Coz that stuff won’t wipe off when I muck it up!! I actually had some of the acetate fall into one of my Distress Ink Pads this morning while I was ‘cleaning’ ink off some clear embossing. That thankfully did wipe right off! So over the weekend, once I’m set up and ready for Class, I’ll do some practice stamping with Stayz On and see how I go.

See through Birthday Card.

Think I better write myself a ‘Don’t think’ note so I don’t put it off. There’s another Kaszazz Workshop where you can colour in the actetate’s stamped image to make a faux stain glass effect for gift tags. See where I’m going with this?

And I’m in love with the three different stamping/embossing/rubbing techniques I learnt yesterday for the weekend’s Class. Super, dooper easy and very messy!! My fingers look like I’ve been fingerpainting all week…not that it would be a bad thing if I had been.

Messy hands = WOW Backgrounds

My Technique Journal looks like it’s about to get a few more entries over the coming days. Once I figure out how to not stick myself to everything with double sided tape.

Wishing you an amazing Thursday!


Christmas Baking and cooking nearly mapped out.

This year I’m going for the more ‘homey’ Christmas style of gifts and food. We’re not going the Traditional Roast for lunch, as here in Brisbane it’s normally a sure thing the weather is going to be hot and steamy enough without turning the kitchen into a sweatbox.

So this week, while I’m prepping and checking the decos and lights, I’m mapping out recipes to attempt for Christmas Lunch as well as for gift ideas.

So I’m back to trawling through Pinterest on the hunt for new ideas and tips…my icing skills are in serious need of improvement or total overhaul. Either way works for me.

So far, without really looking, I’ve found a few great sites which I’m about to share with you. These make it all look sooo easy, nearly Cari Proof…time will tell. As will my patience levels. hmmmm.

Ok, first link is here. This is from Glorious Treats and is a real treat to read.

pastel-snowflake-cookies
Photo credit to Glorious Treats.

Another which I’m keen to try from Keep It Simple, Keep It Fresh is Gluten Free Spritz Cookies. Maybe I’ll make these up into mason jar gifts for those we know who can’t enjoy the run of the mill goodies because of Gluten. Possibilities…worth keeping in mind, but I’ll try them out on The Man first and see what he thinks. Ssssh, won’t tell him they’re GF, just see what he thinks. The link for this one is here.

And a great tip for icing monogram letters is found here. Ok, this was originally for Valentine’s Day, but no reason it can’t be adapted, and the tip on icing is certainly worth keeping for a rainy day. This one is from Sweet Dreams, a great launching pad for learning new cake decorating tips.

I’ll leave it at that for today…got to hunt through some recipe books and magazines that have been (sadly) collecting dust for the better part of a few months to find some more goodies. Let’s just say, The Man is going to be eating like a king for the next few weeks while I trial a number of recipes. Thank goodness he’s got a sweet tooth!

Castles, Dragonflies, Butterflies & Frogs…love kids cards.

I love making cards up for kids. I can let my inner Crafty Diva loose with bright, fun shapes, colours and designs.

Bright & fun dragonfly

And through October & November we have a number of birthdays for the younger family members. Sometimes coming up with new ideas isn’t as easy as it seems, so I’m thankful for Pinterest.

One of the creations I found was for a fold out Castle card…so after doing a mock up/dummy run, I decided to stretch the comfort zone, use some of the stash our cousin had passed to me and make not one, but two Castle Cards for twins turning 2. The link to the instructions is here.

Twin Castle Cards

Was tricky, and fiddly, but I was quite happy with the end result. As I didn’t want their older sister feeling left out (twins birthday was days before parent’s wedding anniversary) I stretched the comfort zone again and made my first Shaker Card. I’d been wanting to do one for awhile, but hadn’t been able to find any tutorials that I could get my head around. That is until a Card Group on Facebook pointed me in the right direction. Instructions if you’re in the same boat as myself can be found here.

Close up of details on Shaker Card Shaker Card

Next week will see four young ones celebrating birthdays. Two on the same day, though they were born two States apart, two hours apart. Two days later my great niece then a day later my Godson.

Froggie Card started

Certainly been busy making up all the cards, and I still need to finish one off!! Plus finish off the dollshouse for our niece.

As the saying goes, no rest for the wicked.

Pink Afternoon Tea for Boobies

Apologies for the rather long time between Posts. Been a little choatic over here over the past month or so, mostly with fun and a few games. Am hoping between now and Christmas I can grab a day or two to myself to indulge in my DIY Diva-ness.

One of the really enjoyable events lately was my Afternoon Tea @ The Blue…which was more pink than anything…as a fundraiser for Breast Cancer Awareness. I even managed to whip up a small refashion for a new skirt and a top to go with!

BCA Top in the making BCA Top & refashioned Skirt

One thing I really learnt, NEVER EVER host a fundraiser right after a Card Class!! Big day is an understatement, but it was lovely to spread the fun from the morning to the afternoon.

Choc Dipped Strawberries & Mini Bounty Bars setting in the fridge Embossed Menu Cards

The Menu included;

Salmon & Cucumber Sandwiches

Rosewater Mini Kisses with Choc surprise

Choc Dipped Strawberries

Grapes

Mini Bounty Bars (homemade)

Fresh Scones with Raspberry Jam & Cream

Pink Upside Down Pear Cake

Hawaiian Hibiscus Loose Leaf Tea

Raspberry Mojito Loose Leaf Tea

Black Loose Leaf Tea

Chia Teabags (I cheated a little!!)

Table Layout I'm a little teapot...

Sadly my mini Jelly Cakes didn’t turn out so great…still not used to our new-ish oven.

Balloons!!

Now I will openly admit, I’m no Martha Stewart…and that was made rather clear to me the day prior when I was attempting to unfurl/poof up the Puffy Garlands to decorate the lounge. Took a lot longer than I expected that’s for sure! Worth it for the overall look, but talk about frustrating!

Setting up Garlands

Also managed to use some tulle to hold the balloons to the weights. Sadly, I didn’t realise our Helium wasn’t as long lasting as the party supply stores supply, so the balloons we did up the day before weren’t at their best when they needed to be. Oh well, live and learn.

Nearly there

All in all, a great day, great laughs..awesome food which The Man enjoyed eating afterwards. He won’t do High Tea per say, but he’ll eat the food no worries!

Till next time…which won’t be too far off I promise. xx

Rosewater Flavoured Choc Filled Meringue Kisses

Straight out of the oven.

I’m rather pleased with myself this morning for managing to re-create these little beauties. Thank You to Darla from Bakingdom for such an easy recipe to follow and produce. You’ll find it here if you’d like to try for yourself.

I did make a few little alterations to my version. I used Rosewater instead of Raspberry Flavouring, which has filled the house with a gorgeous scent all morning. And I wasn’t able to find any small choc buds in our local supermarket yesterday so have used buttons instead, making some of these larger than originally planned.

Choc Button base

Now I’ve never been great with meringue to be honest, but found this method to be a cinch. Took a little longer but the results speak for themselves. And even with a few little mobility hiccups, this is an easily, and quickly, made recipe. I even had a laugh to myself when I was cleaning up the piping bag…talk about a Pink Sticky Sweet Mess.

And yes, I need to work on my piping technique come to think of it. Oh well, I’ll get there one of these days…in the meantime, if it’s messy I’m there.

Enjoy!

Plate of Kisses


Christmas Gifts all wrapped up

Christmas Gift Wrapping Solutions

With Christmas just around the corner, and with my very recent jump into running my own Kaszazz Classes, I’ve been busy for the past few days re-creating some awesome projects to solve nearly every Christmas wrapping dilemma I can imagine! Mind you, this list is still growing…so bear with me please.

I can’t take credit for creating any of these projects, I’ve found a plethora of inspiration on both Pinterest and YouTube. I’ll post some of the links below along with pictures of the projects. I’m a firm believer in giving credit where it is due, and with these lovely ladies having shared in the first place, only fair to recognise them.

Last Christmas was the first time I focused so much on personally creating gifts, and the wrapping, for our close friends and family. Given my limited Skill Set, wasn’t a bad effort, though I do cringe slightly today when I look back at the photos. I know my friends especially appreciated their gifts, partly because it came from me and The Man, and partly because they understood how much it took for me to make them in the first place given my medical circumstances. This year, I’m sure they’ll enjoy everything just as much.

First project I’ve tackled is Christmas Crackers/Bon Bons. Loved making these last year. And loved making this little one using scraps from a larger project (keep reading, it’s coming up soon…I promise), so it’s smaller than the ones I’ll be making next week. On the To Do list is to make up boxes of 6 Bon Bons to give to friends for their Christmas Table.

This little beauties are super easy to make (as are most of the projects I’m currently tackling) though they appear to be more complex than they really are. The hardest part was tying ribbon with my nails at their current length! And using the Envelope Punch Board makes this a cinch to decorate.

Here’s the original YouTube link that I keep going back to; Envelope Punch Board Christmas Bon Bons. There’s plenty of tutorials on YouTube, and I love to scroll through to see what is available. Some of the creativity is amazing!

And here’s my mini version using scraps from the Kaszazz Merry Christmas SB Paper “Journal Stripes”.

Smaller Christmas Bon Bon

I’ve also used the Mini Messages Christmas Un-cut Stamp Set (4109KK) for the sentiments using Distress Ink Pads in Fired Brick (TIM20202) and Pine Needles (TIM21476) along with 1/8″ Organdy Ribbon (5527) coloured with the Pine Needles Distress Ink Pad and an Ink Blending Tool. All products are available from Kaszazz; contact me for more information.

I’ve also made up a Tower Box again using Kaszazz Merry Christmas SB Paper, this time in “Greetings Dots” for the main body, “Journal Stripes” and “Santa’s Sleigh” from the Kaszazz Vintage Christmas SB Paper Collection for the internal boxes.

Inside of Christmas Tower Box Christmas Tower Box

The tutorial for this is also from Youtube; here is the link if you’d like to make this one yourself. Christmas Gift Tower Box/House

The top and bottom has been decorated using a Bow in SB Essentials 12×12 Rouge Cardstock; Bow was made using the Bow Thick Paper Die, and 1/2″ Organdy Swirl Ribbon coloured with Crimson Alcohol Ink Art Marker.

I’d made one of these the previous evening for The Man to store his wedding ring in while he’s at work, along with his cufflinks and shirt studs…so all his formal bling is now nicely stored in one place without it being a jewellery box.

Yesterday was a big crafting day for me after being inspired by another Kaszazz Consultant making Mini Tote Bags with Note Cards. Like myself she was inspired by a YouTube find, and was kind enough to share the link with the rest of us. And I’m now going to share with you! Mini Tote Cards & Bag

I actually made a few of these yesterday, and enjoyed every moment! But this one is made using the Kaszazz Merry Christmas SB “Journal Stripes”, SB Essentials Rouge 12×12 Cardstock for the main body and handles.

Mini Christmas Tote Bag

I then added some 3/8″ Lace Style 5 Ribbon along the base, a little tag using SB Card Essentials White and attached using 1/8″ Organdy Ribbon coloured with Distress Ink Pad Fired Brick. Tag is also edged using Fired Brick. The two daisies are also Kaszazz, though sadly will not be in the new catalogue coming out next month. The large one was coloured using Fired Brick and an Ink Blending Tool. I coloured four 6mm Clear Rhinestones with Crimson Alcohol Ink Art Marker before attaching with Ice Stickles. Sentiment is from the Mini Messages Christmas Un-cut set.

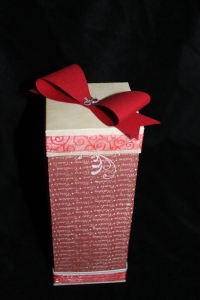
Finally last night I completed my To Do list with a Wine Bottle Bag/Cover. As a few of my friends enjoy a drop of wine, I thought this would be a great addition to any future Class I run where Gift Giving is the focus. Sadly I was unable to find a Kaszazz Workshop that would work, so to Pinterest I went. That was a little frustrating, though I’ve found plenty of inspiration to refashion jeans into wine carriers…that’s for another post another week. But finally, success and off to YouTube to observe and learn.

This tutorial was super easy to follow and work from. And a heap of fun at the same time! I’m a fan…can you tell? hehehe Here’s the link before you want to shoot me; Wine Bottle Gift Box Tutorial

Christmas Wine Bottle Gift Box

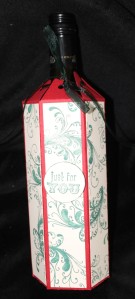
I followed the instructions to the letter, with one exception, but I’ll get to that in a sec. I used, as recommended, Kaszazz SB Essentials 12×12 Rouge Cardstock for the base, SB Pages Ivory 12×12 Cardstock for the panels and stamped with the Fancy Flourish (4222K) Stamp in Distress Ink Pad Pine Needles. The only alteration I made was making the panels an inch shorter to fit my score lines on the main body. Otherwise, brilliant tutorial! Closed off with the 1/8″ Organdy Ribbon coloured with Distress Ink Pad Pine Needles. I then picked out the “Just For You” Stamp from the Mini Messages Retro Un-cut Set (4467K) to stamp on some scrap Ivory Cardstock with the Pine Needles Distress Ink Pad before punching out with the Large Circle Punch (4857) before attaching with Magic Mount Double Sided Tape.

I’m still in shock we had a bottle of wine in the house…it is opened, but as a prop it works great! Which reminds me, need to stock up to get the Christmas Pudding fruit drunk sooner than later. So that will mean more bottles in the house. And the chance to grab a few to make more Gift Boxes. Sounds like a plan. I have found this box is a little roomy for the Shiraz bottle I had on hand, but that’s not a bad thing.

That’s it so far…more to come in the coming weeks. Now I’m off to get these nails shortened and redecorated, hair trim and eyebrow wax…yep, GIRLY TIME!!! Then to finish preperations for my First Card Class on Sunday!

If you do re-create any of these projects please share a picture with me, as I’d love to see how you interpret the instructions, or how you adapt them to suit your own needs. Also, if you’d like to know more about Kaszazz products, please contact me as I can help with that too!


Beginning to feel like Christmas is around the corner?

Today was a Public Holiday around here, yet I still managed to be surprised by a delivery of goodies being dropped off early this morning. Unexpected to say the least, let alone hours earlier than usual. Great start to any day.

And it wasn’t just me getting deliveries today…our Thank You cards have been delivered for the most part to our family and friends around the country. YAY!! Which means I can now share them with everyone else.  Powder Embossing for the ‘Thank You’, embossed butterfly punched out and more red ribbon. They would’ve been sent earlier, but sadly we had a loss in the family around the same time; I’m old fashioned enough to not send out Sympathy cards with Thank You cards.

Thank You Cards ready to go Wedding Thank You Cards

Plus…HAPPY BIRTHDAY to my Mummy-In-Law…her Sparkling Rainbow Butterfly card arrived today just in time.

Rainbow Butterfly Card

Back to today’s goodies though. Another box of supplies from the lovely Team at Kaszazz Head Office. Many of these were ordered specifically for two different Christmas Card projects I wanted to copy and try my hand at. Kaszazz has a huge variety of projects on offer with instructions on how to re-create some amazing cards, scrap pages and other wonderful items out of paper. Last week I picked two to challenge myself with, today I was able to make it happen, Public Holiday or no.

The first set was fantastic!! Had a blast making them with the Flourish Stamp, NOEL stamp, punching and magic mounting…and well within my skillset!! BONUS!!! Love this workshop; one little challenge was the 3D Tree on one of the stamps, but I think my interpretation works. To each their own right?

Kaszazz Card Workshop Flourish Christmas Cards3D Christmas Tree Card

The second set was more tricky. It wasn’t until I was half way through the second card I noticed the skillset on the instructions…Beyond Beginner. Lightbulb moment…it was trickier as it was way out of my comfort zone; way, way galaxy far out of my zone!!

I think I managed to pull it off though by the end of it. A few little points of note…my current fingernail length isn’t a blessing when tying ribbons 10cm long into knots; it’s a hinderance more than anything. Oh and matting and I rarely see eye to eye…unlike the instructions I ended up cutting my matting for the next layer prior to sticking anything to it. For me this was easier. Otherwise, not as easy for myself as the first set, but quite chuffed I managed to complete them all without any looking ready for the reject pile.

Kaszazz Card Workshop Whimsical Christmas Cards

Both of these sets are part of the Cardmaking Workshops run by Kaszazz Independent Consultants across Australia. Looking forward to the day when I can run some myself…not too far but far enough. In the meantime,  I have to tackle more Birthday Cards over the next couple of days. Not sure yet if today’s cards are going out to some special people for Christmas or keep them for my own portfolio to show potential Hostesses down the track. Time will tell…will certainly be making more before too much longer.


Another White Whale overcome!

It continues to amaze me how far things can change in such a short period of time. It wasn’t that long ago, ten months give or take a week, that my Mother and I were discussing at my Gran’s how to make our wedding invites within my limited skill set. I was of the rather firm opinion that she had a little too much (biased) faith in my skills…more than I did at least. Die Cut Flowers

Well, I can say with some confidence, Mum was right.

Wedding invites done and dusted, some more wedding related stationary done and dusted, a number of birthday/anniversary/Christmas cards later and I was discussing only yesterday with Mum again how my largest issue with scrapping is pages. Yes, pages. I have very little patience/skill in them. Don’t get me wrong, love looking at them, and can imagine any number of designs in my head, but when it comes down to the act of putting it together….d’oh!!! Thankfully Mum came to the rescue, and again with her (biased) faith in my abilities…sorry I’ll stop cracking up laughing in a moment…she pointed me in the right direction and today VIOLA!!!

After perusing Pinterest to the end of my world…saving, pinning and gobbling up image after image of Scrap Maps, I finally took the plunge. Probably helped a heap that I had some pictures printed today for this particular purpose. But the Maps were a godsend!! Seriously, if you’re interested in scrapping, yet like myself rather blugh when it comes down to it…map it!!! Plenty of inspiration, actually like anything on Pinterest there’s tonnes of inspiration. It’s then a matter of working out what you can/can’t do…YET!!

Mum’s going to send me a project that she claims is a little on the tricky side of things, but apparently I will be able to knock it over easily enough…a-ha, we’ll see and reserve judgement shall we?

This is the final inspiration I went with today…which you can find at Scrapbook.com.

Scrapbook Inspiration

First challenge to meet was to Kaszazz it to suit my stock and my loyalty. That was reasonably easy to be honest. I’ve used my Small Flower Die with a range of cardstock & papers from our last release in May, as well as spraying some with what was to be the last little bit of my Dylusions Ink Spray (thank goodness I can re-order more before the end of the month!!) for some added colour. All the pictures I’d printed were in Black & White so there wouldn’t be any colour clashing going on. So it was just a matter of matching up colours for the flowers to match the backing frames for the photos.

Butterfly & Flowers

I kept to the rule of “Odds over Evens” in setting out my flowers. It still amazes me how true it is…the eye finds objects in odd numbers more appealing, for the most part. Who am I to argue. And because I adore butterflies, I snuck one in there. It had to be done.

All these pics are from my Hen’s Night back in May. My gorgeous Invisible Bridesmaid organised my surprise transport, and apart from not being able to share it with Mum, it was perfect!!! My Matron of Honour jumped in with me instead; funny story attached, but that’s for another time, and another audience entirely.

Hen's Night Page

When all is said and done, yes I am happy enough with this Page. It is the first of many, I’ve printed out more photos today to keep the buzz alive; so shall be interesting to see how I go. I’m still shuddering at the pages I made up for The Man eight years ago…almost ashamed of them now, but he still loves them because I made them…time to start showcasing what I can do now?


Up ↑